UpscaleAI Creative ClubTry Upscale free7 daysNew guide: 50 Claude animations. Free (3D included)75K+ on InstagramEvery prompt free to copyNew guide: 50 Claude animations. Free (3D included)Try Upscale free7 days

How we made a 3D logo reveal with AI.

Brand book in, 16 second looping video out, with $0 in paid AI credits. Reference, concept, 3D, motion, sound and the final render. Every step, every prompt.

Learn this with us in UpscaleZeePosted byZee @zeeuiuxVideo & reels
In short

How do you make a 3D logo reveal with AI?

Start from a video you love and read the brand book first. Plan the beats so the video loops, pull the logo and colours out of the brand book, draw the 2D parts in code with Claude and build the 3D in Blender. Add sound that lands on each cut, check drafts at 720p, then render the final 16-second loop at 1080p and 60 fps. We spent $0 on paid AI credits.
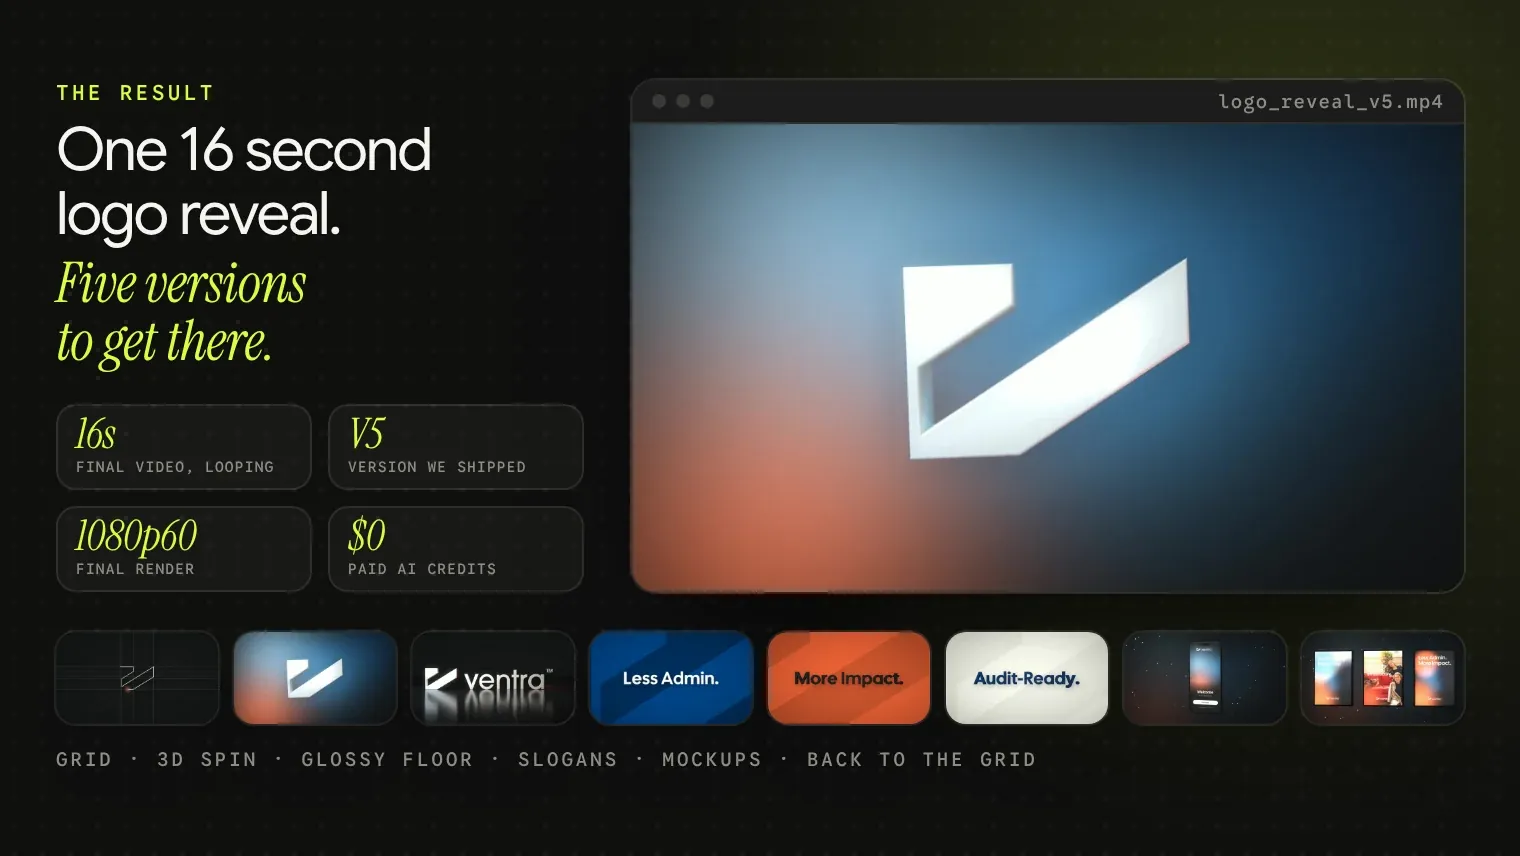
The result: a 16 second looping logo reveal in five versions, rendered at 1080p60 with $0 in paid AI credits, and eight stills from the final video
Before you start

Brand book in, video out.

  1. 01.Everything happens in one conversation with Claude. It writes the code, runs Blender and renders the frames. Run the prompts in order, in the same chat.
  2. 02.A reference video that has the feel you want.
  3. 03.The brand book PDF and the website.
  4. 04.The logo as an SVG or PDF, if the client has one. If not, Claude traces it from the brand book.
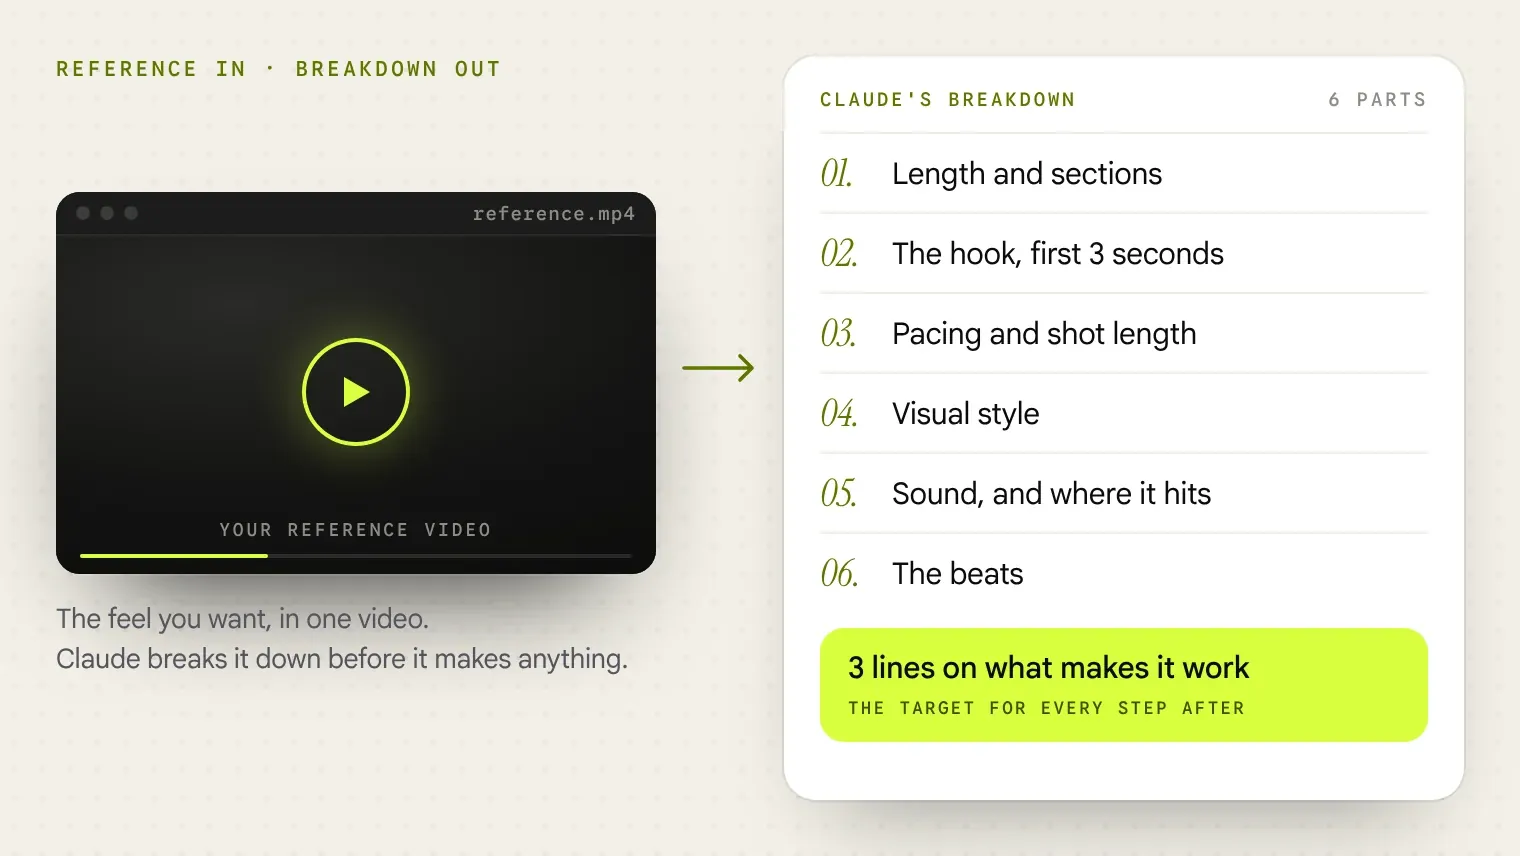
A reference video goes in, and Claude breaks it into six parts plus three lines on what makes it work
01.Step 1 of 10 · Inspiration

Start with a video you love.

Give Claude a reference that has the feel you want. Ask it to break down why it works before planning anything. The breakdown becomes the target for every step after.

PromptPrompt 01 · Break down the reference

I'm sharing a reference video for a new project. Don't make anything yet. First, break it down for me:

1. Total length and how many sections it has

2. The hook: what happens in the first 3 seconds and why it grabs attention

3. Pacing: average shot length in each section, where it speeds up and slows down

4. Visual style: footage types, colour, text on screen, transitions

5. Sound: music mood, sound effects and where they hit

6. The structure as beats (Hook, Turn, Proof, Close or whatever fits)

Then tell me in 3 lines what makes this video work, so we can use the same structure for a logo reveal for BRAND.
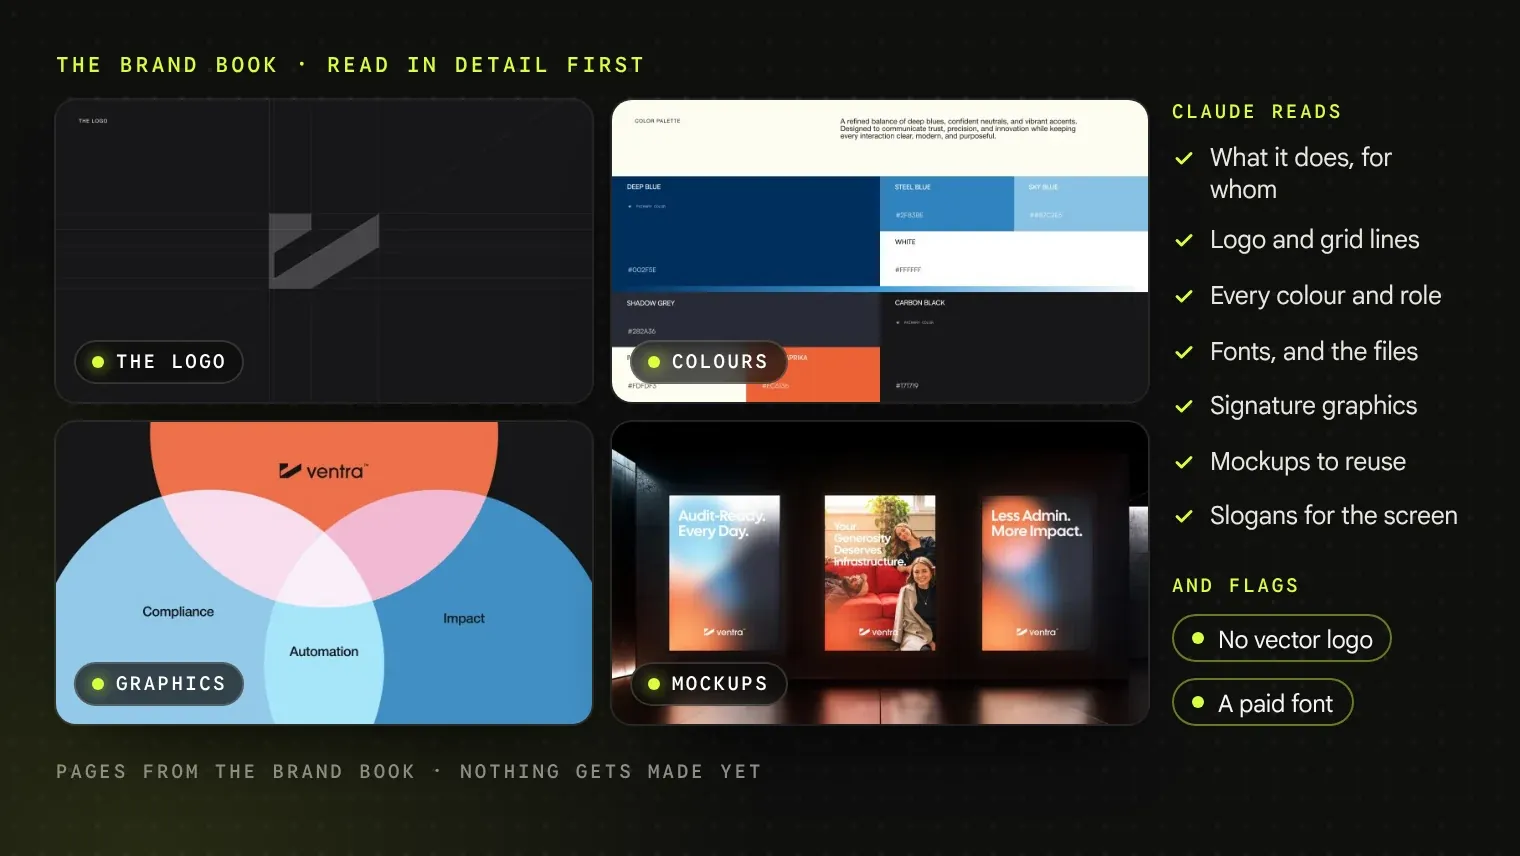
Four brand book pages (logo, colours, graphics, mockups) next to what Claude reads and what it flags
02.Step 2 of 10 · Brand read

Read the brand before anything else.

Give Claude the brand book PDF and the website. Ask for a detailed read first: logo, colours, fonts, graphics, mockups, slogans. It flags what is missing, like a vector logo or a paid font.

PromptPrompt 02 · Go through the brand in detail

Here is the brand book for BRAND: FILE. Also read WEBSITE. Before planning anything, go through it in detail and give me:

1. What the brand does, for whom, and its main line

2. The logo: mark, wordmark, construction grid and guide lines

3. Every colour with its name and role

4. Fonts for headings and body, and whether we can get the files

5. Signature graphics: gradients, shapes, patterns

6. Every mockup in the book we can reuse in the video

7. Slogans and taglines we can put on screen

Flag anything we can't get as a clean file, like a paid font or a logo that only exists as an image.
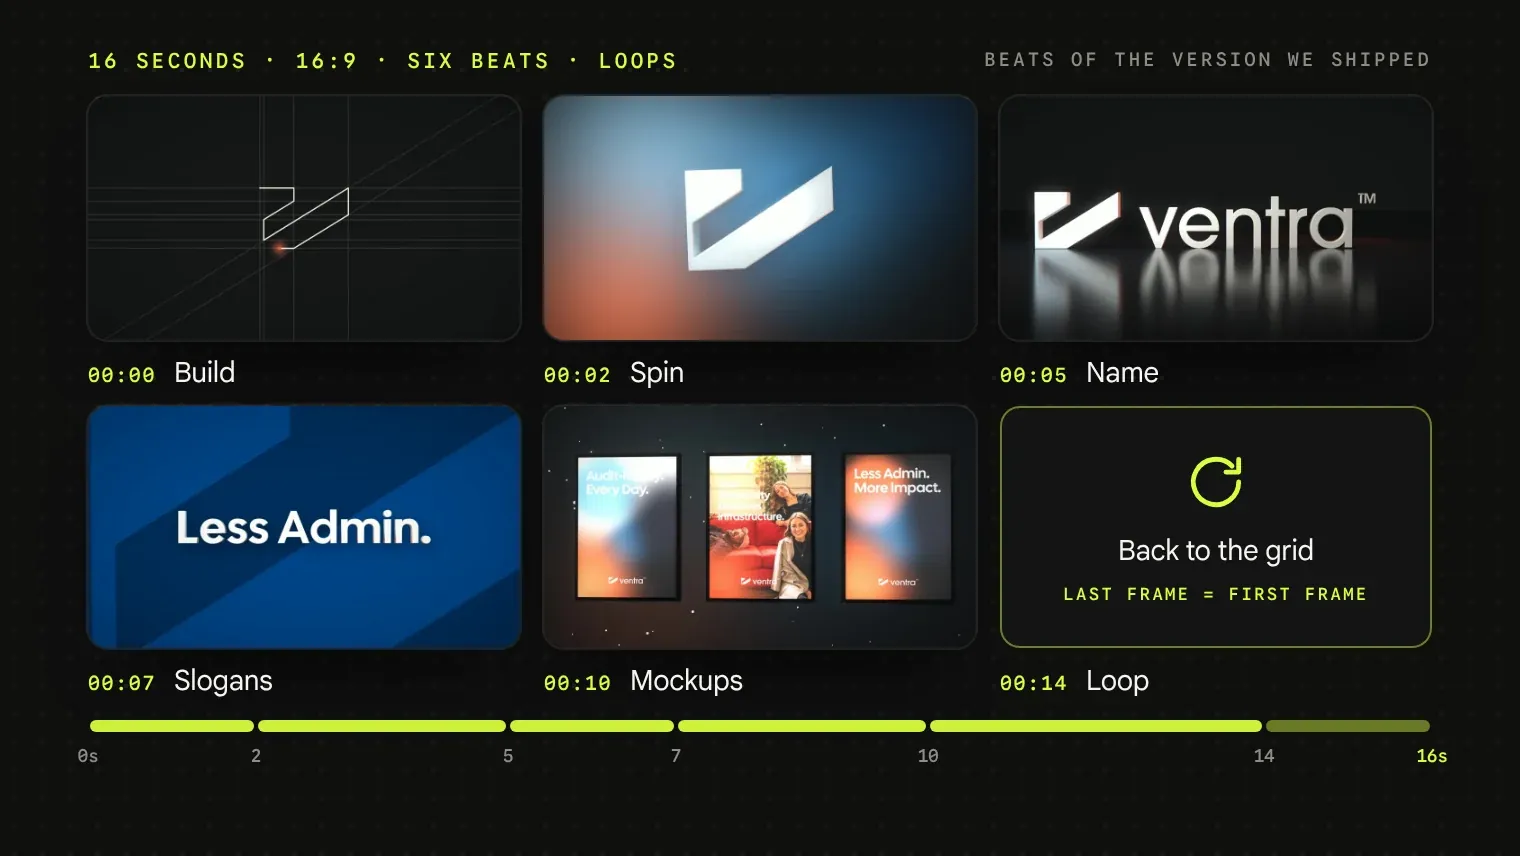
The six beats of the shipped version on a 16 second timeline, ending back on the grid so it loops
03.Step 3 of 10 · Concept

Plan the beats, then close the loop.

Borrow the rhythm of the reference, never its look. Start and end on the same frame so the video loops. Balance 3D animation, text frames and mockups.

PromptPrompt 03 · Concept and beats

Using the reference breakdown and the brand read, plan a 16 second 16:9 logo reveal for BRAND. Don't produce anything yet.

Rules

  • Start and end on THE LOGO CONSTRUCTION GRID so it loops: the last frame must match the first.
  • Open by drawing the logo, then turn it 3D with one clean 360° spin.
  • Balance three kinds of scenes: 3D animation, text frames with SLOGANS and mockups of MOCKUPS.
  • Give each scene its own open space. Use a glossy floor only for THE NAME REVEAL.
  • Transitions: camera moves, dissolves or wipes. No glitch flashes unless I ask.
  • Cut on a 120 bpm grid so the music fits.

Give me the beats as a table: timecode, beat, what we see, transition out. Then list what you'll build in 3D and in 2D, and how long you expect it to render.

Beats of the version we shipped
TimeBeatWhat we see
00:00BuildGrid lines, then the logo is drawn
00:02SpinThe mark turns 3D, one 360° spin
00:05NameGlossy floor, the letters drop in
00:07SlogansThree text frames, one second each
00:10MockupsPhone, badge, posters, social card
00:14LoopDive through the mark, back to the grid
Lesson from our version 3One studio for every scene felt caged. Open space per scene worked better.
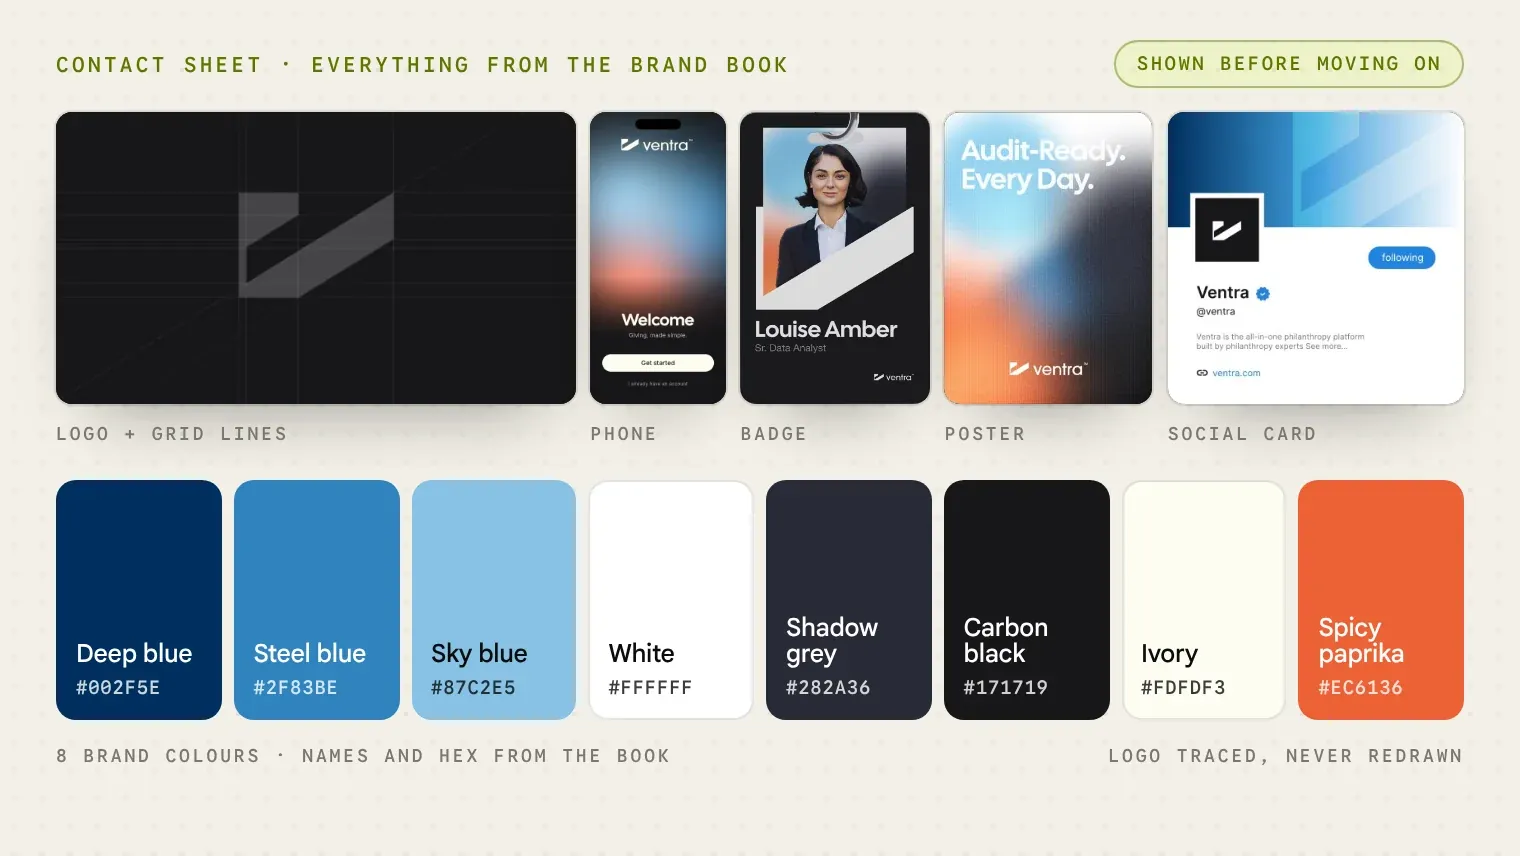
A contact sheet: the logo page, four mockup textures and the eight brand colours with their hex codes
04.Step 4 of 10 · Assets

Pull the assets out of the brand book.

The logo is traced from the file into vector shapes, never redrawn. Colours are sampled, fonts found, or a named stand-in. Mockups are cropped flat, ready to wrap onto 3D objects.

PromptPrompt 04 · Prepare the assets

Prepare the assets from the brand book before building anything:

  • Trace the logo into clean vector shapes: the mark and each letter of the wordmark separately, so they can be extruded in 3D. Never redraw or change the logo.
  • Measure the construction grid lines from the logo page.
  • Sample every brand colour.
  • Get the heading font file: FONT. Tell me if you need a free stand-in.
  • Crop each mockup as a flat texture at the highest resolution: PHONE, BADGE, POSTERS, SOCIAL CARD.

Show me a contact sheet of everything before moving on.
Got the real logo file?If the client has an SVG or PDF logo, give Claude that instead of tracing.
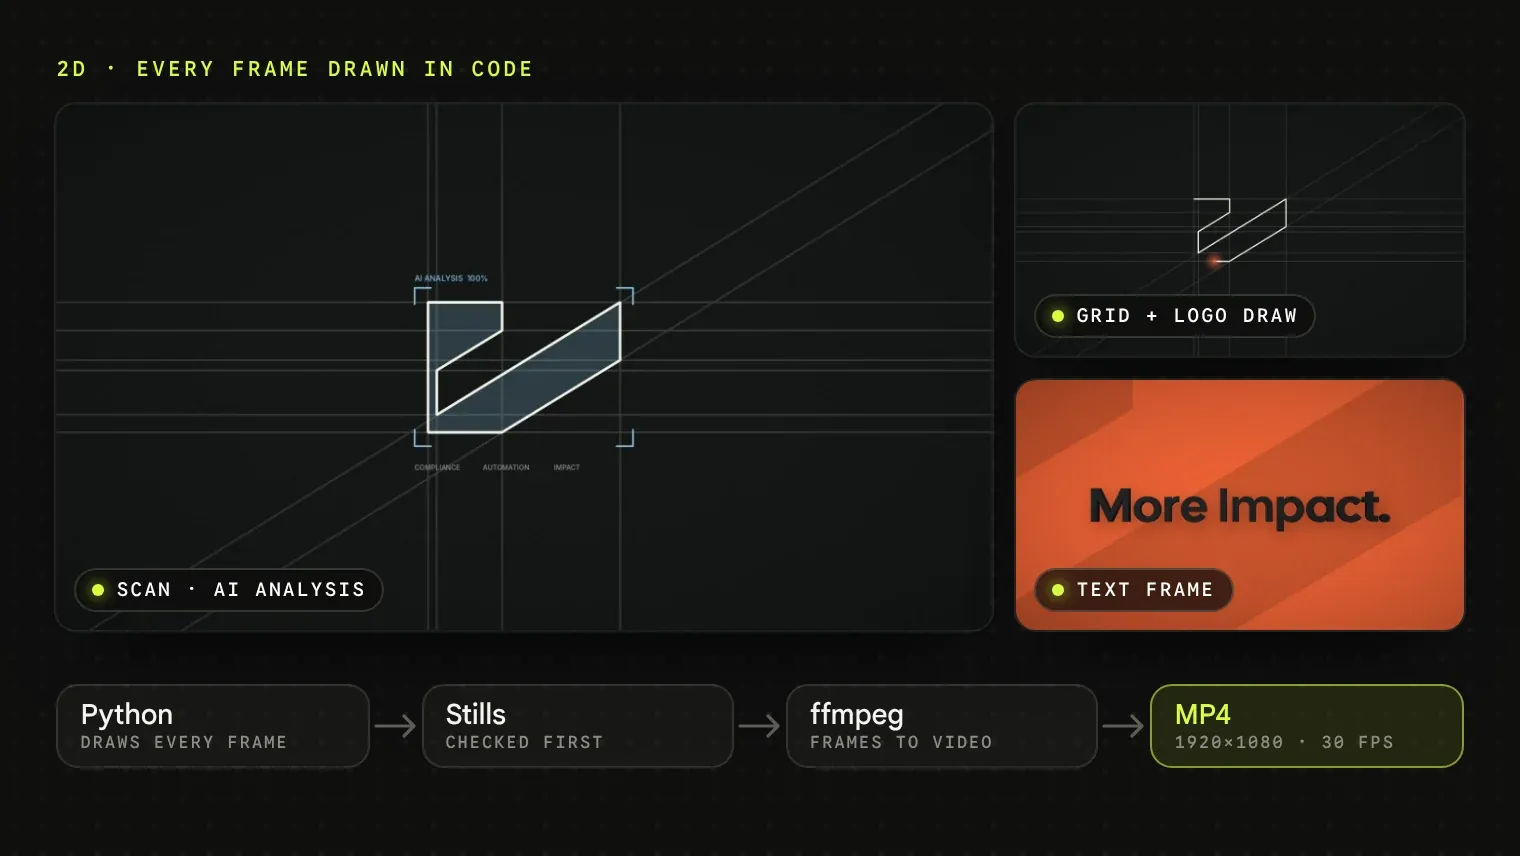
2D frames drawn in code (the scan, the grid and logo draw, a text frame) and the path from Python to stills to ffmpeg to MP4
05.Step 5 of 10 · 2D motion

Draw the 2D in code.

Claude writes Python that draws every frame, and ffmpeg turns the frames into video: the grid, the logo draw, colour wipes and the loop out. Check still frames before rendering any video.

PromptPrompt 05 · 2D scenes

Build the 2D scenes in code (Python and ffmpeg) at 1920x1080, 30 fps:

1. Grid and draw: the construction grid lines on DARK COLOUR. A ACCENT COLOUR dot traces the logo outline, then a scan line fills it with a short "AI analysis" label.

2. Text frames: SLOGAN 1 / 2 / 3 on COLOUR 1 / 2 / 3, with the logo shape large and faint behind the words.

3. Wipes: diagonal wipes along the angle of the logo between scenes.

4. Loop out: fill the frame black, then redraw the grid lines so the last frame matches frame one.

Render still frames at the busiest moments and show me them before you render video.
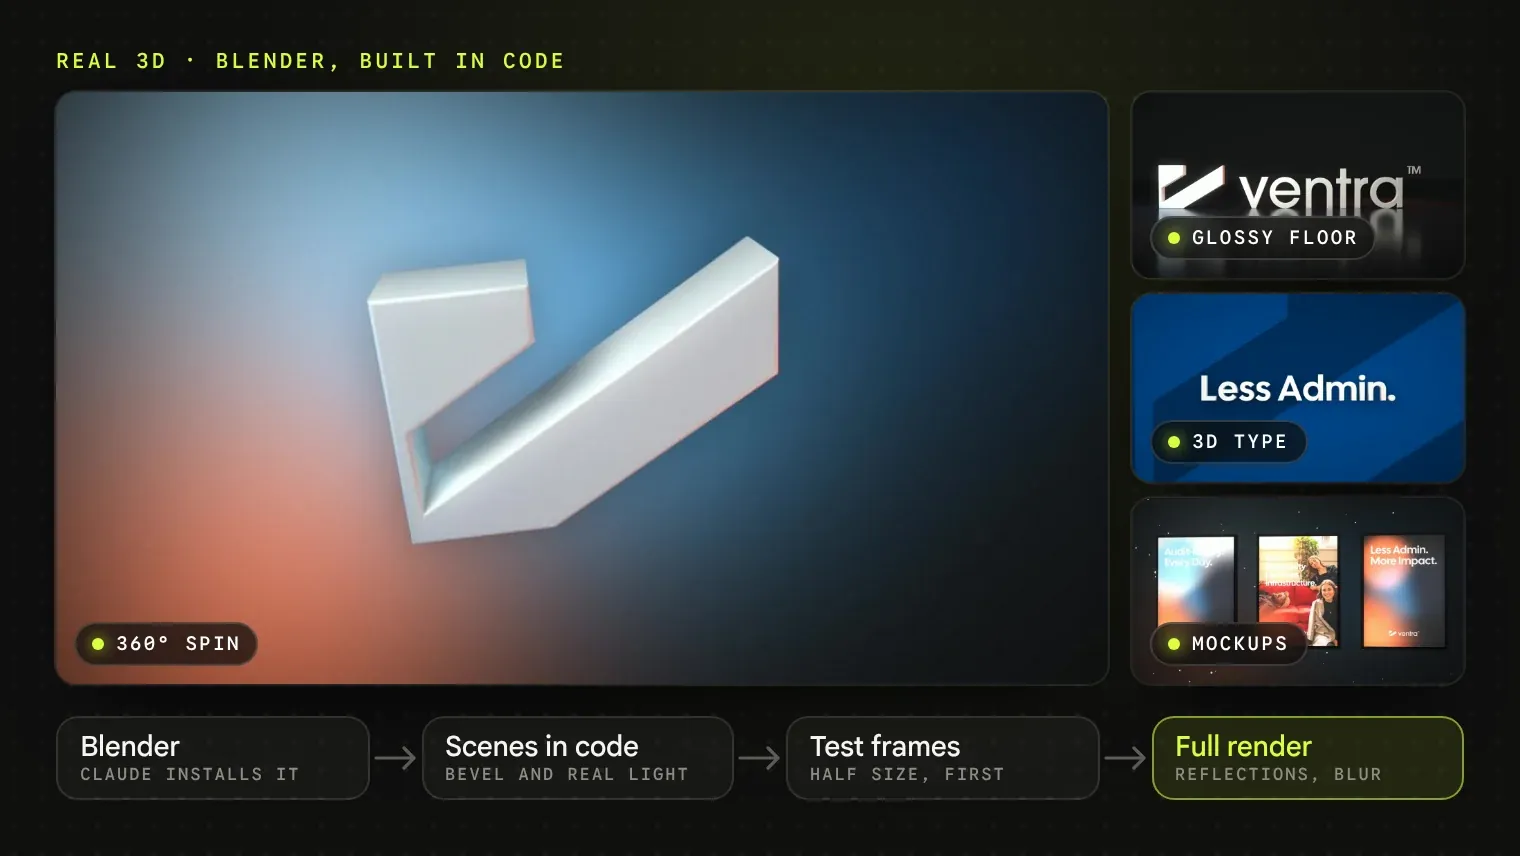
Blender renders: the 360 degree spin, the glossy floor name reveal, 3D type and mockups
06.Step 6 of 10 · 3D

Real 3D, in Blender.

Claude installs Blender and builds every scene in code: a bevelled logo, real light, reflections and motion blur. Test frames at half size before any long render.

PromptPrompt 06 · 3D logo spin and name reveal

Build the 3D scenes in Blender (Cycles), using the vector logo extruded with bevelled edges and lit in brand colours: key light WARM WHITE, rim lights ACCENT 1 and ACCENT 2.

1. Logo spin: the mark floats in BACKGROUND, e.g. a soft blue and orange glow, no floor. One clean 360° spin with motion blur, settling flat to camera.

2. Name reveal: a glossy dark floor with reflections. The mark slides left and the letters drop in one by one with a small bounce.

Render the spin with a transparent background so it sits over the 2D glow. Render 4 test frames at half size first and show me.

PromptPrompt 07 · 3D type and mockups

Add two more 3D sections in Blender, in open space with no floor:

1. Slogans: each line as 3D type in FONT, with a slight bevel, swinging up into place on COLOUR 1 / 2 / 3 backgrounds. One second each.

2. Mockups: PHONE, ID BADGE, POSTERS, SOCIAL CARD as real 3D objects, with the textures from the brand book. Each one moves a little (a phone turning, a badge swinging on its lanyard, posters lighting up one by one). The camera glides from one to the next.

Keep transitions smooth: camera moves and diagonal wipes only. Show me test frames before the full render.
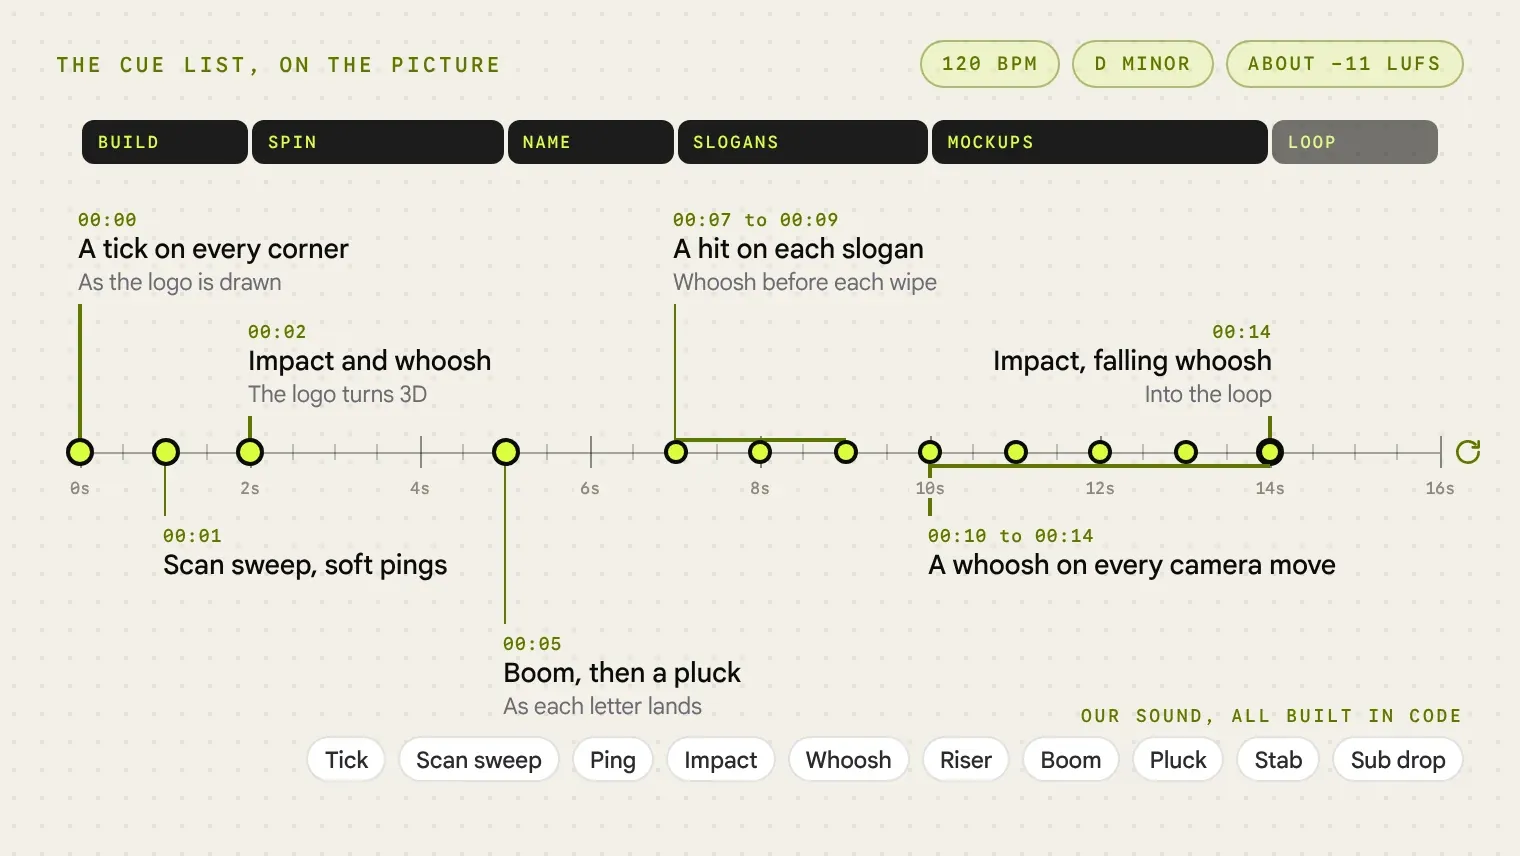
The sound cue list placed on the 16 second timeline at 120 bpm, with the sounds Claude built in code
07.Step 7 of 10 · Sound

Sound that lands on the cut.

Claude can build the music and every effect in code. Or give it your own library and a cue list. Hits land on the cut, risers end on the impact.

PromptPrompt 08 · Music and sound effects

Make the soundtrack in code, no stock files: a 120 bpm electronic track in D MINOR, MOOD, e.g. confident and clean.

Cue list

00:00 a tick on every corner as the logo is drawn

00:01 scan sweep and soft pings

00:02 impact and whoosh as the logo turns 3D

00:05 boom, then a pluck as each letter lands

00:07 / 08 / 09 a hit on each slogan, a whoosh before each wipe

00:10 to 00:14 a whoosh on every camera move

00:14 impact, then a falling whoosh into the loop

Rules: hits land on the cut frame, risers end on the impact, loudness about -11 LUFS, and the end flows into the start so the loop is seamless.
You do the listeningClaude can't hear the result. Listen to it yourself, on speakers and on a phone.
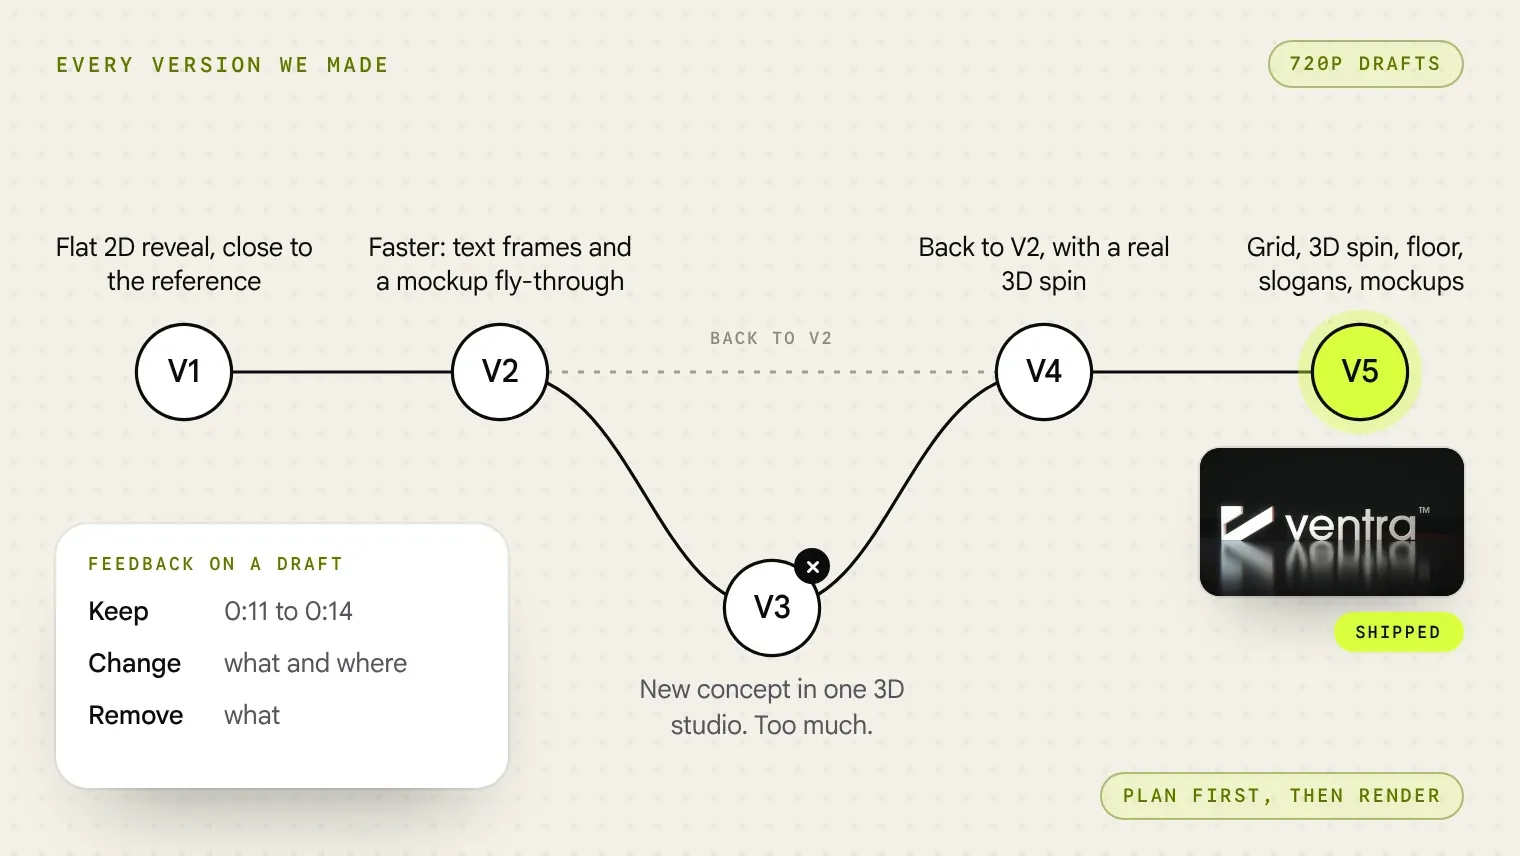
Five versions: V3 was a detour into one 3D studio, V4 went back to V2 with a real 3D spin, V5 shipped
08.Step 8 of 10 · Review rounds

Drafts at 720p, until it is right.

Real 3D is slow, so review small drafts. Say what to keep, change and remove, with timestamps. Ask for the plan before every render.

PromptPrompt 09 · Feedback on a draft

Here's my feedback on draft N:

Keep: TIMESTAMPS AND WHAT YOU LIKE, e.g. 0:09 to 0:10 and 0:11 to 0:14

Change: WHAT AND WHERE

Remove: WHAT

Overall feel: e.g. CLEAN AND MINIMAL / FASTER / BETTER 3D

Tell me your plan for the next version before you render anything. Render the draft at 720p.

Every version we made
VersionWhat it was
V1Flat 2D reveal, close to the reference
V2Faster: text frames and a mockup fly-through
V3New concept in one 3D studio. Too much.
V4Back to V2, with a real 3D spin
V5Grid, 3D spin, floor, slogans, mockups. Shipped.
Point at timestamps“0:11 to 0:14 is great” is worth more than “make it better”.
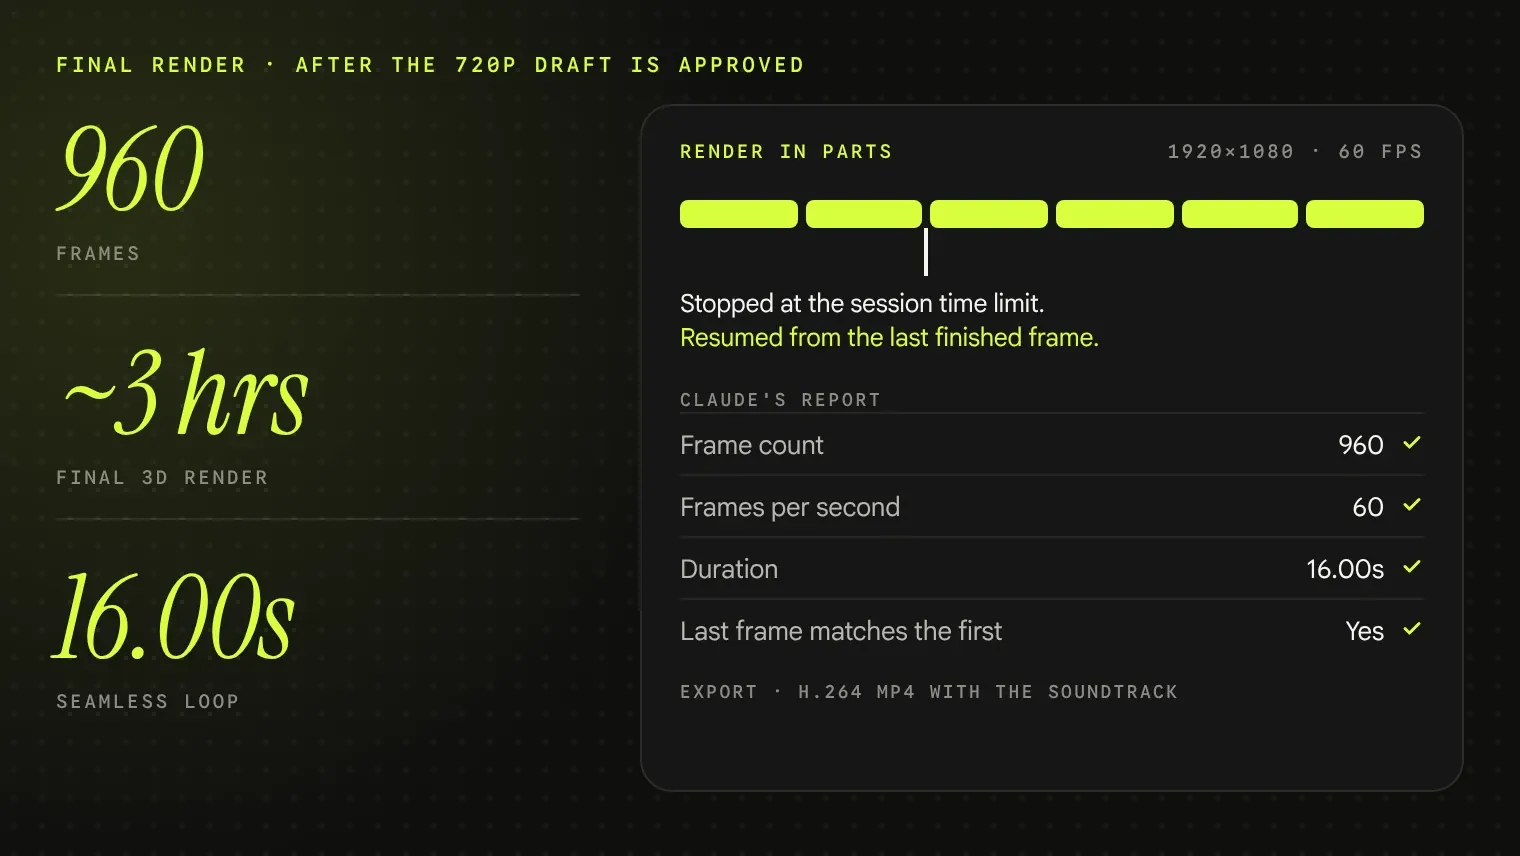
The final render: 960 frames, about 3 hours, a 16.00 second seamless loop, rendered in parts
09.Step 9 of 10 · Final render

Final render: 1080p, 60 fps.

Only after the 720p draft is approved. Every 3D frame is rendered again at 60 fps. Long renders can stop, so render in parts and resume.

PromptPrompt 10 · Final render

Approved. Render the final at 1920x1080, 60 fps.

  • Render every 3D frame again at 60 fps. Don't double frames.
  • Run long renders in parts, so if one stops you resume from the last finished frame.
  • Check every frame file opens before assembling.
  • Report: frame count, fps, duration, and whether the last frame matches the first.

Export H.264 MP4 with the soundtrack.

Render in partsOur first final render stopped at the session time limit. Rendering in parts saved it.
10.Step 10 of 10 · Honest summary

It's not one prompt. It's a process.

What it really takes.

  1. 01.Five versions, including two new concepts, before the one we shipped.
  2. 02.Claude can't watch or hear the video. It checks still frames. You do the watching.
  3. 03.Real 3D is slow on a normal machine. Draft small, render big once.
  4. 04.Never let it redraw the logo. Only the brand file.
QA checklist before you send it

Do your own QA.

  • Watch it 3 times: picture, sound, then as the client.
  • Play it twice in a row: the loop must be invisible.
  • Logo shape and colours match the brand book exactly.
  • Slogans and names are spelled right.
  • No flicker, jumps or doubled frames in the 3D.
  • Every hit lands on a cut.
  • Check it on a phone, sound on and off.
Free trial 7 days

Learn AI with us, every day.

Upscale is the AI Creative Club on Skool, hosted by Zee and Bilal. This guide is one lesson. The club is where we keep going.

  • Daily video tutorials
  • New AI tools tested every week
  • A room of creatives sharing wins, work and new finds
Try Upscale free7 daysskool.com/upscaleclub
Zee and Bilal, hosts of Upscale
Downloads

Take it with you.

The files for this guide. Free.

PDFHow we made a 3D logo reveal with AIPDF · 24 pages · 1.5 MBDownload

More free guides

Newest first
Motion

50 Claude animations. Free (3D included)

One prompt for each. 20 are in 3D.Open the guide
1/50
Apps & UI

Design a full app in Claude, the easy way.

5 steps, 5 prompts and one checklist.Open the guide
1/9
Video & reels

How we made a $1,200 video with AI.

A real client video. 9 steps and 10 prompts.Open the guide
1/23
UpscaleTry free7 days
Try Upscale free 7 days · Start now75K+ on InstagramEvery prompt free to copyTry Upscale free 7 days · Start now

How we made a 3D logo reveal with AI.

Brand book in, 16 second looping video out, with $0 in paid AI credits. Reference, concept, 3D, motion, sound and the final render. Every step, every prompt.

Learn this with us in UpscaleZeePosted byZee @zeeuiuxVideo & reels
In short

How do you make a 3D logo reveal with AI?

Start from a video you love and read the brand book first. Plan the beats so the video loops, pull the logo and colours out of the brand book, draw the 2D parts in code with Claude and build the 3D in Blender. Add sound that lands on each cut, check drafts at 720p, then render the final 16-second loop at 1080p and 60 fps. We spent $0 on paid AI credits.

Before you start

Brand book in, video out.

  1. 01.Everything happens in one conversation with Claude. It writes the code, runs Blender and renders the frames. Run the prompts in order, in the same chat.
  2. 02.A reference video that has the feel you want.
  3. 03.The brand book PDF and the website.
  4. 04.The logo as an SVG or PDF, if the client has one. If not, Claude traces it from the brand book.
A reference video goes in, and Claude breaks it into six parts plus three lines on what makes it work
01.Step 1 of 10 · Inspiration

Start with a video you love.

Give Claude a reference that has the feel you want. Ask it to break down why it works before planning anything. The breakdown becomes the target for every step after.

PromptPrompt 01 · Break down the reference

I'm sharing a reference video for a new project. Don't make anything yet. First, break it down for me:

1. Total length and how many sections it has

2. The hook: what happens in the first 3 seconds and why it grabs attention

3. Pacing: average shot length in each section, where it speeds up and slows down

4. Visual style: footage types, colour, text on screen, transitions

5. Sound: music mood, sound effects and where they hit

6. The structure as beats (Hook, Turn, Proof, Close or whatever fits)

Then tell me in 3 lines what makes this video work, so we can use the same structure for a logo reveal for BRAND.

Four brand book pages (logo, colours, graphics, mockups) next to what Claude reads and what it flags
02.Step 2 of 10 · Brand read

Read the brand before anything else.

Give Claude the brand book PDF and the website. Ask for a detailed read first: logo, colours, fonts, graphics, mockups, slogans. It flags what is missing, like a vector logo or a paid font.

PromptPrompt 02 · Go through the brand in detail

Here is the brand book for BRAND: FILE. Also read WEBSITE. Before planning anything, go through it in detail and give me:

1. What the brand does, for whom, and its main line

2. The logo: mark, wordmark, construction grid and guide lines

3. Every colour with its name and role

4. Fonts for headings and body, and whether we can get the files

5. Signature graphics: gradients, shapes, patterns

6. Every mockup in the book we can reuse in the video

7. Slogans and taglines we can put on screen

Flag anything we can't get as a clean file, like a paid font or a logo that only exists as an image.

The six beats of the shipped version on a 16 second timeline, ending back on the grid so it loops
03.Step 3 of 10 · Concept

Plan the beats, then close the loop.

Borrow the rhythm of the reference, never its look. Start and end on the same frame so the video loops. Balance 3D animation, text frames and mockups.

PromptPrompt 03 · Concept and beats

Using the reference breakdown and the brand read, plan a 16 second 16:9 logo reveal for BRAND. Don't produce anything yet.

Rules

  • Start and end on THE LOGO CONSTRUCTION GRID so it loops: the last frame must match the first.
  • Open by drawing the logo, then turn it 3D with one clean 360° spin.
  • Balance three kinds of scenes: 3D animation, text frames with SLOGANS and mockups of MOCKUPS.
  • Give each scene its own open space. Use a glossy floor only for THE NAME REVEAL.
  • Transitions: camera moves, dissolves or wipes. No glitch flashes unless I ask.
  • Cut on a 120 bpm grid so the music fits.

Give me the beats as a table: timecode, beat, what we see, transition out. Then list what you'll build in 3D and in 2D, and how long you expect it to render.

Beats of the version we shipped
TimeBeatWhat we see
00:00BuildGrid lines, then the logo is drawn
00:02SpinThe mark turns 3D, one 360° spin
00:05NameGlossy floor, the letters drop in
00:07SlogansThree text frames, one second each
00:10MockupsPhone, badge, posters, social card
00:14LoopDive through the mark, back to the grid
Lesson from our version 3One studio for every scene felt caged. Open space per scene worked better.
A contact sheet: the logo page, four mockup textures and the eight brand colours with their hex codes
04.Step 4 of 10 · Assets

Pull the assets out of the brand book.

The logo is traced from the file into vector shapes, never redrawn. Colours are sampled, fonts found, or a named stand-in. Mockups are cropped flat, ready to wrap onto 3D objects.

PromptPrompt 04 · Prepare the assets

Prepare the assets from the brand book before building anything:

  • Trace the logo into clean vector shapes: the mark and each letter of the wordmark separately, so they can be extruded in 3D. Never redraw or change the logo.
  • Measure the construction grid lines from the logo page.
  • Sample every brand colour.
  • Get the heading font file: FONT. Tell me if you need a free stand-in.
  • Crop each mockup as a flat texture at the highest resolution: PHONE, BADGE, POSTERS, SOCIAL CARD.

Show me a contact sheet of everything before moving on.

Got the real logo file?If the client has an SVG or PDF logo, give Claude that instead of tracing.
2D frames drawn in code (the scan, the grid and logo draw, a text frame) and the path from Python to stills to ffmpeg to MP4
05.Step 5 of 10 · 2D motion

Draw the 2D in code.

Claude writes Python that draws every frame, and ffmpeg turns the frames into video: the grid, the logo draw, colour wipes and the loop out. Check still frames before rendering any video.

PromptPrompt 05 · 2D scenes

Build the 2D scenes in code (Python and ffmpeg) at 1920x1080, 30 fps:

1. Grid and draw: the construction grid lines on DARK COLOUR. A ACCENT COLOUR dot traces the logo outline, then a scan line fills it with a short "AI analysis" label.

2. Text frames: SLOGAN 1 / 2 / 3 on COLOUR 1 / 2 / 3, with the logo shape large and faint behind the words.

3. Wipes: diagonal wipes along the angle of the logo between scenes.

4. Loop out: fill the frame black, then redraw the grid lines so the last frame matches frame one.

Render still frames at the busiest moments and show me them before you render video.

Blender renders: the 360 degree spin, the glossy floor name reveal, 3D type and mockups
06.Step 6 of 10 · 3D

Real 3D, in Blender.

Claude installs Blender and builds every scene in code: a bevelled logo, real light, reflections and motion blur. Test frames at half size before any long render.

PromptPrompt 06 · 3D logo spin and name reveal

Build the 3D scenes in Blender (Cycles), using the vector logo extruded with bevelled edges and lit in brand colours: key light WARM WHITE, rim lights ACCENT 1 and ACCENT 2.

1. Logo spin: the mark floats in BACKGROUND, e.g. a soft blue and orange glow, no floor. One clean 360° spin with motion blur, settling flat to camera.

2. Name reveal: a glossy dark floor with reflections. The mark slides left and the letters drop in one by one with a small bounce.

Render the spin with a transparent background so it sits over the 2D glow. Render 4 test frames at half size first and show me.

PromptPrompt 07 · 3D type and mockups

Add two more 3D sections in Blender, in open space with no floor:

1. Slogans: each line as 3D type in FONT, with a slight bevel, swinging up into place on COLOUR 1 / 2 / 3 backgrounds. One second each.

2. Mockups: PHONE, ID BADGE, POSTERS, SOCIAL CARD as real 3D objects, with the textures from the brand book. Each one moves a little (a phone turning, a badge swinging on its lanyard, posters lighting up one by one). The camera glides from one to the next.

Keep transitions smooth: camera moves and diagonal wipes only. Show me test frames before the full render.

The sound cue list placed on the 16 second timeline at 120 bpm, with the sounds Claude built in code
07.Step 7 of 10 · Sound

Sound that lands on the cut.

Claude can build the music and every effect in code. Or give it your own library and a cue list. Hits land on the cut, risers end on the impact.

PromptPrompt 08 · Music and sound effects

Make the soundtrack in code, no stock files: a 120 bpm electronic track in D MINOR, MOOD, e.g. confident and clean.

Cue list

00:00 a tick on every corner as the logo is drawn

00:01 scan sweep and soft pings

00:02 impact and whoosh as the logo turns 3D

00:05 boom, then a pluck as each letter lands

00:07 / 08 / 09 a hit on each slogan, a whoosh before each wipe

00:10 to 00:14 a whoosh on every camera move

00:14 impact, then a falling whoosh into the loop

Rules: hits land on the cut frame, risers end on the impact, loudness about -11 LUFS, and the end flows into the start so the loop is seamless.

You do the listeningClaude can't hear the result. Listen to it yourself, on speakers and on a phone.
Five versions: V3 was a detour into one 3D studio, V4 went back to V2 with a real 3D spin, V5 shipped
08.Step 8 of 10 · Review rounds

Drafts at 720p, until it is right.

Real 3D is slow, so review small drafts. Say what to keep, change and remove, with timestamps. Ask for the plan before every render.

PromptPrompt 09 · Feedback on a draft

Here's my feedback on draft N:

Keep: TIMESTAMPS AND WHAT YOU LIKE, e.g. 0:09 to 0:10 and 0:11 to 0:14

Change: WHAT AND WHERE

Remove: WHAT

Overall feel: e.g. CLEAN AND MINIMAL / FASTER / BETTER 3D

Tell me your plan for the next version before you render anything. Render the draft at 720p.

Every version we made
VersionWhat it was
V1Flat 2D reveal, close to the reference
V2Faster: text frames and a mockup fly-through
V3New concept in one 3D studio. Too much.
V4Back to V2, with a real 3D spin
V5Grid, 3D spin, floor, slogans, mockups. Shipped.
Point at timestamps“0:11 to 0:14 is great” is worth more than “make it better”.
The final render: 960 frames, about 3 hours, a 16.00 second seamless loop, rendered in parts
09.Step 9 of 10 · Final render

Final render: 1080p, 60 fps.

Only after the 720p draft is approved. Every 3D frame is rendered again at 60 fps. Long renders can stop, so render in parts and resume.

PromptPrompt 10 · Final render

Approved. Render the final at 1920x1080, 60 fps.

  • Render every 3D frame again at 60 fps. Don't double frames.
  • Run long renders in parts, so if one stops you resume from the last finished frame.
  • Check every frame file opens before assembling.
  • Report: frame count, fps, duration, and whether the last frame matches the first.

Export H.264 MP4 with the soundtrack.

Render in partsOur first final render stopped at the session time limit. Rendering in parts saved it.
10.Step 10 of 10 · Honest summary

It's not one prompt. It's a process.

What it really takes.

  1. 01.Five versions, including two new concepts, before the one we shipped.
  2. 02.Claude can't watch or hear the video. It checks still frames. You do the watching.
  3. 03.Real 3D is slow on a normal machine. Draft small, render big once.
  4. 04.Never let it redraw the logo. Only the brand file.
QA checklist before you send it

Do your own QA.

  • Watch it 3 times: picture, sound, then as the client.
  • Play it twice in a row: the loop must be invisible.
  • Logo shape and colours match the brand book exactly.
  • Slogans and names are spelled right.
  • No flicker, jumps or doubled frames in the 3D.
  • Every hit lands on a cut.
  • Check it on a phone, sound on and off.
Free trial 7 days

Learn AI with us, every day.

Upscale is the AI Creative Club on Skool, hosted by Zee and Bilal. This guide is one lesson. The club is where we keep going.

  • Daily video tutorials
  • New AI tools tested every week
  • A room of creatives sharing wins, work and new finds
Try Upscale free7 daysskool.com/upscaleclub
Zee and Bilal, hosts of Upscale
Downloads

Take it with you.

The files for this guide. Free.

PDFHow we made a 3D logo reveal with AIPDF · 24 pages · 1.5 MBDownload
Zee and Bilal, hosts of Upscale
UpscaleAI Creative Club on Skool
Hosted by Zee and Bilal

Learn AI with us, every day.

  • Daily video tutorials
  • New AI tools tested every week
  • A room of creatives sharing wins, work and new finds
Try Upscale free7 days

More free guides

1/50Motion

50 Claude animations. Free (3D included)

One prompt for each. 20 are in 3D.
1/9Apps & UI

Design a full app in Claude, the easy way.

5 steps, 5 prompts and one checklist.
1/23Video & reels

How we made a $1,200 video with AI.

A real client video. 9 steps and 10 prompts.